Gambas 2.8 on Ubuntu 9.04 (or 2.13 on UB910!)
- Words in italics show a menu path
- Words in “quotes” should be typed (without the quotes).
- Click on a screen image to enlarge and then go back with the previous arrow.
Introduction
This project is directed at newcomers to Linux who have some VB experience and need a little help in converting their thinking to Gambas. It is not specifically a Gambas tutorial for users new to programming.
I will go through the installation of Gambas itself using Ubuntu 8.04 although this should be transferable to other Distros.
If you just want a quick peek at the code, I have put the two files in a pdf at Pamphlet source.pdf
What does the project do at the end of it?
I work in a small retail organisation and receive large numbers of pamphlets and catalogues from representatives, through the post and from Trade Shows. Few of them are used enough for formal filing although it is always nice to be able to find them, in reasonable time, when required.
This very simple system catalogues the pamphlets and locates them within any number of large plastic storage boxes. Speed of data entry is of the essence and searching is based on raw data rather than a category, sub-category process. It is essential that the operator is able to get into the program, enter a pamphlet and exit in the shortest possible time.
Some of the program such as data file creation would not have been included had this not been a tutorial.
As with most software, the program logic is simple enough. The complexity comes in trying to cope with all the weird and wonderful things that end-users will try and do with it!
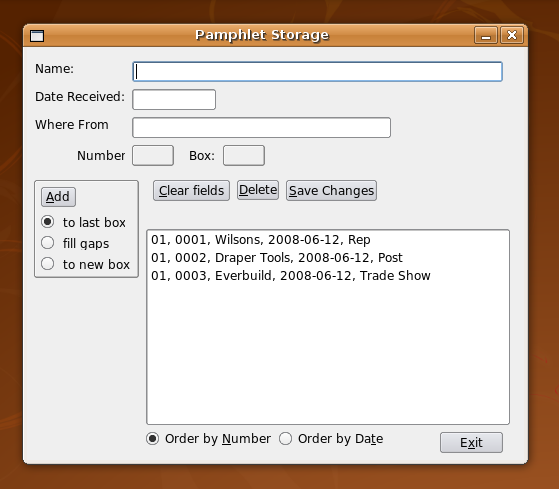
Here’s what the screen should look like at the end.
What steps will we be undertaking?
- Check that SQLite3 is installed
- Install Gambas
- Download the project source code
- Create a new project and start the screen creation process.
- Complete the screen creation process by copying across the supplied full definition.
- Open the program itself in a text editor and copy and paste sections into the project.
- Create an executable and a screen launcher.
Check that SQLite3 is installed
SQLite3 is a great little database and should be installed on your system. Just as well to check or the program will crash later when trying to find it. SQLite3 is single user (not a problem for us here). There are obviously other database products available to Gambas such as MySQL, PostgreSQL and Firebird.
applications, accessories, terminal. Enter “sqlite3”. You should see the SQLite version number and a SQLite prompt. Enter “.quit” (that’s dot quit) to exit sqlite3 and close the terminal. If you don’t have SQLite3 installed then (from the same terminal window) enter “sudo apt-get install sqlite3” . Install and test again.

Install Gambas
Many distributions have Gambas in their repositories. Unfortunately some are more up to date than others. The current latest version (7th Oct 2009) is 2.16.0 but you would have to compile it yourself. Ubuntu 9.04 has easy access to Gambas 2.08 and Ubuntu 9.10 uses Gambas 2.13. Fedora 11 and Mandriva 2009 have more up-to-date versions though any of the above will do for this tutorial. For Ubuntu you can either load from System, Administration, Synaptic (search for Gambas and click on the full development package) or you can enter ‘sudo apt-get install gambas2’ from a terminal.
From Ubuntu, try and avoid using the repositories (i.e. UB9.04: Applications,Add/Remove. ub910: Applications,Software Centre) . I suspect they are incomplete. Or if you have done that, go into Synaptic, search on Gambas and install the components which have not been installed by the repository installation.
You should now be able to run Gambas with applications,programming,Gambas2.
Download the complete project
Click on this link pamphlet.tar.gz to download the completed project. If you are using Firefox and have not reset the download path, the compressed file will downloaded to your desktop. In any event find the download and double-click it. Click on the Extract button and save the pamphlet directory under your home directory or somewhere where you can find it.
If you look in places,home folder and find the pamphlet directory you will see two files: Fmain.form (the screen definition file) and Fmain.class (the program file). FMain.class is described as a Java file which it isn’t! Both are text files and can be inspected with a text editor. This is not the full story however and if you view, hidden files you will see other files that Gambas needs to recognise your project.
You could load this project directly by opening Gambas, selecting open project and double-clicking the pamphlet directory. There is a point of confusion (or at least was for me when I started) which makes it worthwhile going through at least the next section before having a look at the program itself.
Creating a new Project
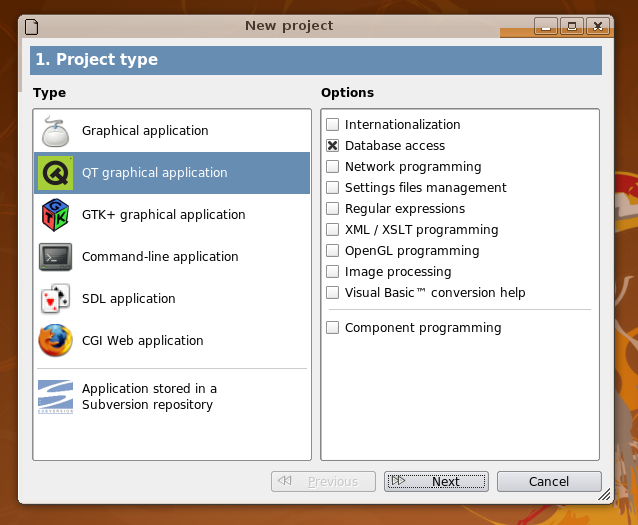
If you are continuing from the previous section, File, New. If you are starting from the desktop then reload Gambas (Applications, Programming, Gambas2, New Project). Gambas can make use of either of two graphics libraries (Qt and GTK+). You can use either although the first option in the menu (Graphical Application) will choose a default for your environment (GTK on Gnome for say Ubuntu and Qt on KDE for say Kubuntu). Choose ‘QT Graphical Application’ for this tutorial and click on “Database access” to load the relevant component and then click Next.
I must admit the I found the next screen (2. Project directory) a little confusing at first. You are not selecting the project directory itself (that is defined by the project name which you give in the next screen). You are selecting the directory which will hold the project directory. For example, I have created a Gambas directory in my home directory under which I save my projects (like pamphlet). If you want to do that then use the create subdirectory button to create a gambas subdirectory under your home directory. Click on that once and then on next.
Under “3. Project Information” you define the name of the project directory itself in the name field (type in ‘myPamphlet’). The title field is descriptive (Enter ‘My re-creation of the Pamphlet Project’). then ok and ok again. Close the tips window.
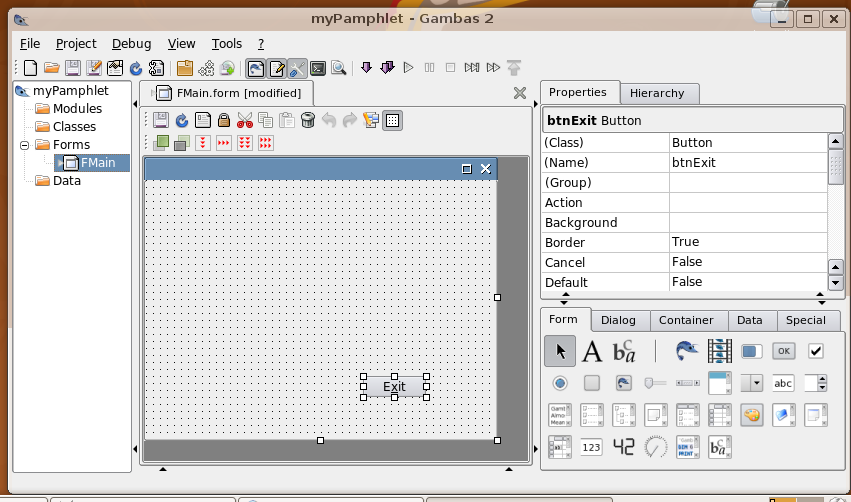
![]()
The tree on the left shows a default form Fmain. The triangle indicates that it is the startup screen. You could right click on Fmain and change its name but don’t do it for this example. If you double click on Fmain, a blank form will be displayed. Click on the Toolbox button (crossed spanner and screwdriver) in the top row to display the toolbox. Drag the button (showing OK) across to the form and resize it with the handles. Drag it around the screen a bit. Change the name in the properties table on the right to ‘btnExit’. Change the text field in the properties table to ‘E&xit’. The ampersand puts the shortcut underline under the ‘x’ in ‘Exit’.
Double-click on this button and the program file attached to the Fmain form is displayed. The cursor is displayed within a button click event. Enter “Fmain.close”. This (surprise, surprise) will close the main screen when you press the Exit button. You now have two tabs above the program screen and can change from Fmain.form to Fmain.class and back again.

Save the project (file, save or click the disk icon in the icon bar) and run with the right-pointing triangle. The running application may be minimised at the bottom of the screen at startup. If so, click on it to maximise. Click on Exit or alt-x to close.
Completing the screen definition.
We could go through the whole screen creation in this fashion although would be exceptionally tedious. We will copy the supplied Fmain.form from the download over the Fmain.form we have just created and go on from there.
To do this, exit from Gambas completely, Places, Home Folder and find the Fmain.form in the downloaded pamphlets directory. Drag this downloaded FMain.form from the pamphlet directory to your new myPamphlet directory. Confirm the over-write. Exit from the editor and reload Gambas.
The project myPamphlet should be an option at the top of the recent list so click on it. This should now display the completed form.
If you click the run triangle, the old form with the single Exit button is displayed. Click the ‘compile all’ button (double down arrow) and try again. The Exit button inherits our previous code although there is not much action in the rest of the screen (surprise, surprise: there is no code to drive it all).
Completing the code
What I propose now is to load the downloaded Fmain.class into a text editor and cut-and-paste bits into the Fmain.class for myPamphlet. That way we will quickly build up an idea of how the program works. In Gambas, click on the Fmain.class tab to display the code. Delete the two empty events (new and open) leaving just the btnExit_click event. Applications, Accessories, Text Editor and then Open and navigate to the downloaded Fmain.class.
Drag over the variable definitions (down to the first line xxxxxxxxxxxxxxxxxxxxxxx) and copy it into the same position in the myPamphlet version. (you can use ctrl-c to copy highlighted text and ctrl-v to paste into myPamphlet).
Copy the two subroutines (bounded by xxxxxxxxxxxxxxxxxxxxxx lines). The first interrogates the database in the order defined by the radio buttons under the listbox. and adds the recordset to the listbox. The second clears the fields on the screen.
Next copy across the code for the Form_Open event. The program looks for the database pamphlets.db in the application directory. If it does not find it, it creates a text file MakeData.sql which is used as an input to define the table. A shell command then creates the database using MakeData.sql as input. I am sure there is a more subtle way of doing this in SQLite3 but hey, it works.
You could of course use MySQL, PostgreSQL or Firebird instead of SQLite3 in which case you would have to specify a host, username and password.
Now copy the txtName_keyRelease code across. This distinguishes a control key (alpha-side return, numeric-side enter and tab) from any other key. The program will not let you leave an empty field (not with the keyboard anyway). As you type the description of a pamphlet into the field, the listbox is adjusted to allow only lines which contain the typed text. If the textbox is emptied (e.g. with the backspace) the ListFill is used to display all the data again. This is also the method used to find a pamphlet that you require and in a few letters will show a small range of options. Clicking on one of these in the listbox will display the box and pamphlet number for retrieval from your plastic boxes.
Next copy the code for the txtDate_KeyPress event. This makes sure that only valid characters are entered by checking the keypress against the string ‘0123456789/’. It also checks that an entered date makes sense (e.g. 34/2/8 or not!). Finally it puts in todays date if the field is left blank.
Copy the code for the next two events (txtWherefrom_KeyPress and btnAdd_KeyPress) but not btnAdd_click yet. These two events allow the use of the keyboard in addition to the mouse but don’t add much logic.
Leave the btnAdd_click event for now. It is the core of the program and we’ll leave it to last. Obviously, the order that the events appear in Fmain.class is unimportant.
Add the btnClear_click code. This calls the two sub-routines in order. ClearFields clears all the text boxes and ListFill re-populates the listbox with all the available data. Panel1.Enabled=True enables the add button which should be disabled when an existing pamphlet is displayed to prevent it being added a second time. This is a pants solution which, if things were any more complicated, should be controlled by indexing the database.
Add the lstSupplier_Click code. This extracts the pamphlet number from the selected line and looks up the record in the database with it. SQLite can only sort dates in the format yyyy-mm-dd so this has to be reversed for the textfield display.
Add the btnDelete_Click code. This checks that a pamphlet is actually selected before asking you to confirm deletion.
Add the btnSave_Click code. This checks that a pamphlet is actually selected before saving any changes back to the database and re-filling the listbox.
Add the rbutNumOrder_Click and rbutDateOrder_Click code. these just refill the listbox in pamphlet number order or date order.
Finally add the btnAdd_Click code. This is the heart of the software. A check is made that something has been entered in the name field. If the date field is blank it is set to today’s date. An empty WhereFrom field is allowed. Because the database is not indexed, the last box in use and last pamphlet number in use is found by iteration. Depending on which of the three radiobuttons in panel1 is selected, the new pamphlet is added at the end of the last box, at the start of a new box or by filling in any gaps which result from previous deletions. Once again the date is manipulated into a format that SQLite can sort.
Create an executable and Desktop launcher
With the pamphlet program loaded, click the ‘make executable’ button on the top row (three meshing gears). Accept the default name pamphlet.gambas and leave it in the myPamphlet subdirectory.
Close or minimise Gambas and right-click on the desktop. Create launcher and give the launcher a brief name (e.g. PamMan). Browse for the pamphlet.gambas you have just created and click ok. You can also change the icon by clicking on it.
That’s all, folks!
As you can see, I am no genius programmer. The point is that there are millions of us out there. Many of us want to have a go although we tend to get overlooked particularly in Linux where the level of dedication and persistence required means that only experts achieve success.
That’s a real pity and will perhaps count against Linux in the long term.
Please let me know of any problems in this brief tutorial.

February 26, 2010 at 7:44 am |
Do I need an internet connection to install Gambas on Ubuntu 9.04?
Thanks
February 27, 2010 at 8:56 pm |
I have been thinking about this and suspect the answer is yes. You could in theory start with a copy of the download on disc (I have a magazine cover disc with such a tar.bz2 Gambas file on it. Compiling from this will not work without all the development components outlined in the Ubuntu page on the Gambas website (getting started, installation page, ubuntu and then under your version). These development packages are not present on the Ubuntu install CD. Nor is the repository version of Gambas. I don’t claim to be an expert and could easily be wrong!
February 4, 2010 at 8:18 am |
I have prob where some component missing after step 3
gb.db.form missing
February 7, 2010 at 12:03 pm |
Hi
I suspect your have installed from the Ubuntu repository which (really annoyingly) is incomplete. I suggest you either:
run ‘sudo apt-get install gambas’ (without parentheses) from applications,accessories,terminal
or
go into synaptic (system,administration,synaptic), search on gambas and install any not-installed components.
September 30, 2009 at 12:09 pm |
This tutorial is fantastic, thank you for taking the time to share and inspired people like me. Linux is a great platform, for general computing use to the very specific. I hope one day many more people will come to discover its power which includes the community, people like you!
GAMBAS is a great addition to the wealth of Linux applications, a point to note is that many of the Visual Basic tutorials can be use with GAMBAS.
Thanks
March 10, 2009 at 1:48 pm |
thank you for attempting to address the shortcomings of Gambas documentation. As a 70 + returnee to programming I am only to aware of the problems the newbies face.